Product Description
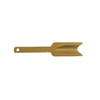
The RPP Flyweight lever action Loading Gate greatly reduces the effort required to stoke your Rossi 95 It's a masterfully tuned, competition grade part right out of the gate. SASS approved.
Starting with a massive reduction in spring weight, the RPP gate requires only about 1.5 lbs. of force to open fully, while the factory loading gate can require in excess of 5 lbs.
Next, we redesigned the lever-action loading gate to offer substantially more clearance for cartridges, further reducing load effort. This is a significant benefit when loading fat, straight wall ammo like the Marlin 444. In fact, during testing we discovered that we could load a .444 dummy through the gate of a typical Marlin 336 .30-30, without benefit of the Model 444's magazine tube clearance bulge. That's first class leg room!
Finally, we paid very careful attention to the inside "feed lip" area of the gate, optimizing geometry to ease gate opening against an on-deck round, and offer smooth feeding, with perfect case head control. With every gate precisely CNC machined from solid bar stock and hand polished, consistent results are assured.
Material is 7075-T6 aluminum, the strongest grade available. Engineered for highly stressed air frames, 7075 has extraordinary fatigue strength for thousands of flex cycles without failure. When anodized, it has a surface hardness exceeding hardened steel, for excellent wear properties.
RPP Flyweight Marlin Loading Gate Features:
* Spring weight reduced by up to 70%
* No tuning required, saving you time and hassle
* Greatly increased cartridge clearance
* No knife sharp edges
* Easy loading and smooth, reliable feeding
* Precisely machined from 7075-T6 aluminum billet and hard anodized for extreme durability
* Available in black, gold, or clear anodized finish (silver color to closely match stainless rifles)
* 10-15 minute installation time
* Single Action Shooting Society (SASS) approved
INSTALLATION
A couple of good screwdrivers is all that's needed.
The gun will need to be partially disassembled - just go slow, and remember that each screw needs to return to it's original home, so get a piece of cardboard box, draw an approximation of the receiver on it, and poke a hole in your drawing where each screw can rest until reassembly.
1) Clear the rifle & ensure the chamber and magazine are EMPTY.
2) Unscrew/remove the tang screw from the upper/rear receiver tang, and pull off the buttstock to the rear.
3) Partially open bolt/lever, remove lever pivot screw and slide lever out of the bottom of the receiver (no need to remove bolt)
4) De-cock the hammer with the safety disengaged. Push forward on the hammer spring bridge and pull or push out one side of its groove. This will free the hammer spring
5) Remove hammer pivot screw, bottom trigger plate screw and side support screws to free the trigger plate from the receiver.
6) Remove the trigger plate / lower tang from the bottom of the receiver (some gentle prying may be needed).
7) Pull the locking lug out of the bottom of the receiver and swing the carrier out of the receiver (no need to remove the carrier pivot screw)
8) Unscrew the loading gate spring (1” behind he loading gate opening) and install the new gate and screw it in
Reassemble in reverse order.
Product Videos
Videos
-

Ranger Point Precision Loading Gate Installation
Hey guys! In this episode we take you through the installation...
-

Ranger Point Precision loading gate install
I demonstrate the install of Ranger Point Precision's new load...
-

Ultimate Marlin Dark 336: Ranger Point Precision M-lok Handguard
I went to Ranger Point Precision looking for a trigger and a c...


